Painting Your Dice Miner Mountain
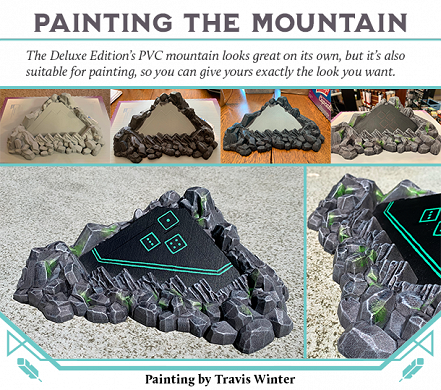
For Dice Miner, I got the chance to put my minis-painting hobby to good use by painting the plastic "mountain" as an example … on company time, even! For all you Dice Miner fans out there, here's how I did it.
I started the project by washing the mountain with soap and water, to ensure all impurities were cleaned off the plastic. (Most plastics use a release agent that allows the item to slide easily out of the mold after completion.) Then check your mountain for spurs, mold lines, or any extra plastic bits that don't belong. Remove them using sandpaper, a hobby knife, or a plastic file.
Before painting, the mountain needs a primer coat. Use primer, not regular paint, as it's designed to adhere to the object and give your paint a surface to grab on to as well. I used a light grey spray primer called Grey Seer (Games Workshop). I almost used black but felt that creating the darker recessed areas would be easier than highlighting up from black in the crevices. When using a spray primer, keep the spray nozzle 10-12 inches from the object and use light coats. You can fill in details of the mountain with too much paint/primer!
The first coat of
paint was Basilicanum Grey (Contrast/Games Workshop). Contrast paint
is a heavy-pigment, watery paint that allows most of the color to fall
into cracks or crevices of the model while also adding a bit of color
to the raised areas of the model. The next steps involve dry brushing
and 3 different grey paints (dark grey, medium grey, and a light grey — any 3 shades of grey
will be fine). To dry brush, just stick your brush in the paint,
then wipe it along a paper towel until most of the paint is off the
brush, and then flick it lightly across the area of the model you
want to add the color to. You can test your dry brushing technique using the
underside of the mountain that no one will see, since it still gives you an
accurate representation of how it will look.
For the darker grey, I left a fair bit of paint on the brush so it would cover more area and add color to the main side of the rocks. For the medium grey, I took most of the paint off the brush so it wouldn't cover up all the first round of dry brushing, and highlighted further up each rock on the mountain. The final, light grey was the lightest touch on the tops of each rock individually, adding a final highlight. When highlighting, think how the object would look when light is hitting it. The cracks/crevices will be darker as the shadows would be in that area. I then painted the dice face black. (If you look closely, you can see my pencil outline of ideas for freehand work on the mountain!)
To get the final details on the rocks, I used a bright white paint (White Scar/Games Workshop) to line detail very carefully along the rock edges where I wanted the most light to show on the model. I then used a green paint to represent moss. (In retrospect, I should have used PVA/Elmer’s Glue and a light dusting of green flock. But I'm sure I'll get to paint a few more so I can correct this in the future!) I then used Sybarite Green (Games Workshop) to decorate the face of the mountain. I tried to match the color of the scrollwork in the logo and was at a loss on what to do. My freehand work leaves a lot to be desired, so I needed something simple but that still added a little pop to the model. This was the hardest part of the job and I had to cover up a lot of my first attempts with black and start again. Don't be discouraged when you make a mistake, since you can always paint over it and try again! Just use a pencil to give yourself some guidelines on where you want the paint to go.
Have fun and tag us when you post your painted mountains!!!
-Travis Winter